Search Results
78 results found with an empty search
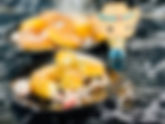
- Tallahasse's Twinkie Donuts
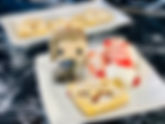
Tallahasse's Twinkie Donuts It's 2020, so maybe it's reasonable not to rule out a zombie apocalypse heading our way before December 31. If that's the case, you don't want to be like Tallahassee and hunting for some Twinkies across Zombieland! Better to be safe than sorry and learn how to make these tasty donut versions of Tallahassee's favorite treat! Servings: 12 Donuts Prep Time: 30 Minutes Total Time: 1 Hour Ingredients Twinkie Donuts 1/4 cup salted butter, softened 4 large eggs, separated into whites and yolks 2 tablespoons milk 1/4 teaspoon cream of tartar 1/4 cup granulated sugar 1/2 cup cake flour 1/4 cup all-purpose flour 1/4 teaspoon salt 1 teaspoon baking powder 1 tablespoon vanilla 2 teaspoons butter extract Marshmallow Filling 8 oz marshmallow fluff 1/4 cup milk 1 cup powdered sugar Instructions Donuts: Preheat the oven to 350ºF. Grease the cavities in a donut pan and set aside. Donuts: In a medium bowl, whisk together ½ cup cake flour, ¼ cup all-purpose flour, ¼ teaspoon salt, and 1 teaspoon of baking powder. Set aside. Donuts: In a large bowl, beat 4 egg whites until foamy. Add ¼ teaspoon cream of tartar and beat until soft peaks form. Soft peaks will stick up when you remove the mixer, but will flip over on the top (like the top of a Hershey’s kiss). Donuts: In a medium bowl, beat 4 egg yolks for 1-2 minutes. Add ¼ cup of sugar and beat until the mixture is thick. Fold the egg yolks into the egg whites. Donuts: In a small bowl, melt ¼ cup of butter in 20 second increments. Set aside to cool. Add 2 tablespoons of milk to the melted butter. Donuts: Fold the dry ingredients carefully into the mixture within the large bowl. Fold the butter mixture, 1 tablespoon vanilla, and 2 teaspoons butter extract into the large bowl. Donuts: Fill a piping bag with the batter and pipe into the donut pan. Bake for 15 minutes or until a toothpick inserted comes out clean. Allow to cool. Filling: In a large bowl, beat together 8 ounces of marshmallow fluff, 1/4 cup of milk, and 1 cup powdered sugar. You may need to add more powdered sugar if the filling is not thick enough. Fill a piping bag. Filling: Poke holes in the bottom of each of the donut utilizing a small piping tip. Fill the holes with the marshmallow filling. Filling: Sift powdered sugar over the filled donuts to complete the look. Enjoy! #zombieland #tallahasse #donut #donuts #twinkies #marshmallow
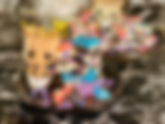
- Guardians of the Galaxy Cookies
Guardian of the Galaxy Cookies I'm trying really hard not to make a pun about these sugar cookies being out of this world, but that's really the perfect way to describe them! These cookies are fun and flavorful, sandwiched with some cream cheese buttercream and hiding some intergalactic baking chips! If you're looking for some additions to your baking playlist - this recipe is a perfect excuse to add The Guardians of the Galaxy soundtrack to the rotation! What decade of music do you hope they'll bring into the franchise for Vol III?! Servings: 24 Cookies Prep Time: 1 Hour Total Time: 2.5 Hours Ingredients Galaxy Cookies 1 + 1/4 cups unsalted butter, softened 3 tablespoons cream cheese, softened 1 large egg 2 large egg yolks 3 + ½ cups all-purpose flour 1 + ½ cups granulated sugar ½ teaspoon baking powder 2 teaspoons cream of tarter 1 teaspoon vanilla extract ½ teaspoon almond extract 1 teaspoon kosher salt Cream Cheese Buttercream Filling 1/2 cup unsalted butter, softened 8 oz cream cheese, softened 3 teaspoons vanilla extract 6 cups powdered sugar 1 cup of unicorn baking chips Instructions Cookies: In a large bowl, mix 3 + ½ cups all-purpose flour, ½ teaspoon baking powder, and 2 teaspoons cream of tartar. Set aside. Cookies: In another large bowl, beat 1 + 1/4 cups of unsalted butter and 3 tablespoons of cream cheese until smooth and creamy. Add 1 + ½ cups of granulated sugar. Beat on high speed for at least 5 minutes until there are no remaining sugar granules. Cookies: Add the egg, egg yolks, vanilla extract, and almond extract to the butter and sugar. Beat until well-incorporated. Cookies: Add 1 teaspoon of kosher salt to the dough. Sift in the flour mixture. Beat on low speed until the dough is just combined. Cookies: Divide the dough into four equal sections and place them in four smaller bowls. Dye the dough black, pink, purple, and blue. Cookies: Prepare a large floured surface. Create small balls of dough and place the balls in a closely assembled randomized pattern on the floured surface. (See video for an example). Place a sheet of parchment paper over the dough and flatten with a rolling pin. Cookies: Use a star cutout and cut out the star shapes. Place on a cookie sheet covered with parchment paper. Chill for at least 3 hours or overnight (if possible). Cookies: After chilling, pre-heat the oven to 350˚F. Bake the cookies for 10-12 minutes. Allow the cookies to cool completely. Buttercream: In a large bowl, beat together 1/2 cup of unsalted butter, 8 ounces cream cheese, and 3 teaspoons of vanilla extract until smooth and creamy. Buttercream: Beat 6 cups of powdered sugar into the mixture. Assembly: Fill a piping bag with the buttercream. Pipe along the edges of one of the star cookies and sandwich with another cookie. Press the unicorn baking chips along the sides. #marvel #sugar cookies #guardians of the galaxy #groot #rocket racoon #cream cheese buttercream
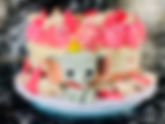
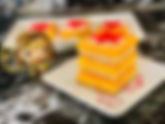
- Dumbo's Circus Cheesecake
Dumbo's Circus Cheesecake If you are looking for another way to enjoy some frosted animal cookies, here's an excuse to buy a bag (or several ;)) of your favorite nostalgic treat! This white chocolate cheesecake features frosted animal cookies in the crust, within layers of the cheesecake, and as a garnish for the buttercream! It's also no-bake, so no worries about any of the typical pitfalls when it comes to making cheesecake! Serve some up to cool off during these last few weeks of summer! Servings: 1 9-inch cheesecake Prep Time: 4 Hours Total Time: 15 Hours Ingredients Animal Cookie Crust 2 + ¼ cups frosted animal cookies, crushed ¼ cup salted butter, melted Cheesecake Filling 3 tablespoons gelatin powder 6 tablespoons water, cold 24 ounces (3x8 oz blocks) cream cheese, room temperature 1 + ½ cups heavy whipping cream 1 teaspoon vanilla extract 2 cups white chocolate, melted Pink food gel 1 cup frosted animals cookies, chopped White Chocolate Ganache Topping 1 1/2 cups white chocolate chips, melted 1/2 cup heavy whipping cream Cream Cheese Buttercream 1/2 cup unsalted butter, softened 8 oz cream cheese, softened 3 teaspoons vanilla extract 5 cups powdered sugar Instructions Crust: Line a 9 inch springform pan with cooking spray and parchment paper. Crust: In a food processor (or using a Ziploc bag and a rolling pin), crush enough animal cookies to fill 2 + ¼ cups. Melt ¼ cup of salted butter in the microwave. Combine in a small bowl. Crust: Press the mixture into the bottom of the springform pan using a spoon. Chill in the freezer for at least 1 hour. Cheesecake: Add 3 tablespoons of gelatin powder and 6 tablespoons of cold water together in a small mixing bowl. Stir until well-combined; wait for 5 minutes. Cheesecake: In a large microwave safe bowl or using a double boiler, melt 2 cups of white chocolate chips. Allow time to slightly cool. Cheesecake: In a large bowl, add 3 8 ounce blocks of cream cheese,1 + ½ cups of heavy whipping cream, and 1 teaspoon vanilla extract. Beat on high speed until well combined. Heat the gelatin in the microwave for 30 seconds and then add the gelatin and white chocolate to the mixture. Beat until well-combined. Cheesecake: Split the cheesecake batter into three bowls, ½ mixture in one bowl, ¼ mixture in one bowl, and ¼ mixture in another bowl. Set aside the bowl with ½ of mixture for now. In one of the ¼ mixture bowls, stir in pink food coloring until the desired color is reached. Cheesecake: Line a small bowl with plastic wrap. Pour in enough of the pink batter to cover the bottom of the bowl. Then add some of the white batter in the ¼ bowl on top. Alternate until you have used up all of the batter in the ¼ cup bowls. Chill in the fridge to set for at least 1 hour. Cheesecake: While the pink and white dome is chilling, the remaining ½ batter may have begun to set. If so, microwave it for 30 seconds until it is workable. Cheesecake: Take the pink and white dome out of the plastic wrap in the bowl and place in the center of the cheesecake crust. Pour in 1/3 of the ½ remaining mixture around it. Sprinkle chopped animal cracker cookies on top. Pour in another 1/3 of the ½ remaining mixture, and then top with chopped animal crackers. Pour in the remainder of the batter until the dome is covered. Chill for at least 5 hours or overnight (preferably). Remove the cheesecake from the springform pan. Sprinkle with chopped animal crackers. White Chocolate Ganache: Put ¾ cups of white chocolate chips in a heat-proof bowl. Microwave ¼ cups of heavy whipping cream until it begins to bowl. Pour it over the chocolate chips. Allow it to sit for 3 minutes and then whisk until smooth. If not completely melted, microwave for an additional 20 seconds on defrost setting. Color the ganache with pink food gel. White Chocolate Ganache: Pour the ganache onto the cheesecake and spread into an even layer. Chill for 1 hour. Buttercream: In a large bowl, beat together 1/2 cup of unsalted butter, 1 cup cream cheese, and 3 teaspoons of vanilla extract until smooth and creamy. Buttercream: Beat 5 cups of powdered sugar into the mixture. Buttercream: Pipe dollops of buttercream on top of the ganache. Sprinkle rainbow sprinkles on top of the buttercream and top with an animal cookie. Enjoy! #disney #dumbo #cheesecake #no bake #animal cookies #frozen
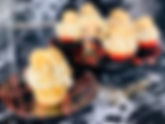
- Eleven's Eggo Cupcakes
Eleven's Eggo Cupcakes Critics say these cupcakes get an Eleven out of 10! Inspired by Eleven's affinity for Eggo's, these maple cupcakes taste exactly like a bite out of a delicious waffle! You can have your dessert for breakfast with these sweet treats, even if it's not the most nutritious start to your day. ;) These maple cupcakes are complimented with an amazing maple syrup buttercream and topped with mini waffles made out of chocolate and peanut butter! Servings: 16 cupcakes Prep Time: 1.5 Hours Total Time: 2.5 Hours Ingredients Maple Waffle Cupcakes 3/4 cup buttermilk 1/4 cup salted butter, softened 1/4 cup vegetable oil 2 large eggs 2 teaspoons vanilla extract 2 teaspoons baking powder 1 3/4 cup all-purpose flour 3/4 cup granulated sugar 3/4 cup maple syrup (plus more for drizzling) 1 cup white chocolate chocolate chips 1/2 cup peanut butter chocolate chips Waffle silicone mold Maple Syrup Buttercream 1 cup unsalted butter, softened 2 tablespoons heavy cream 1/2 tablespoon vanilla extract 4 tablespoons maple syrup 6 cups powdered sugar Instructions Cupcakes: Preheat the oven to 350˚F. Line two tins with 18 cupcake liners. Cupcakes: In a medium bowl, whisk together 1 ¾ cup of all-purpose flour and 2 teaspoons of baking powder. Set aside. Cupcakes: In a large bowl, beat ¼ cup of salted butter until smooth and creamy (30 seconds). Add ¾ cup sugar and beat until well combined (1-2 minutes). Add ¾ cup buttermilk, ¼ cup vegetable oil, 2 large eggs, and 2 teaspoons of vanilla extract. Beat until well-combined. Cupcakes: Add the dry ingredients to the wet ingredients. Beat until just combined. Fold in 3/4 cup of maple syrup. Cupcakes: Fill the cupcake liners ¾ full of the batter. Bake for 22 minutes or until a toothpick inserted into the center of the cupcake comes out clean. Allow to cool. Waffle Chocolate Topping: In a microwave safe bowl, melt 1 cup of white chocolate chips and ½ cup of peanut butter chips. Add more white or peanut butter chips until the desired color is reached. Fill a waffle silicone mold with the chocolate and allow time to cool. Another idea if you don’t have a silicone mold: use mini Eggo waffles! Buttercream: In a large bowl, beat 2 cups of unsalted butter until smooth and creamy (2-3 minutes). Add 2 tablespoons of heavy cream and ½ tablespoon of vanilla extract and beat until well-combined. Add 2 + ½ tablespoons of maple syrup and beat until combined. Add 6 cups of powdered sugar in 2 cup increments until the desired consistency is reached. Assembly: Pipe a double donut of buttercream onto each of the cupcakes. Drizzle with maple syrup. Add two waffle molds on top of one another and then drizzle a small amount of syrup on top. Top with a white chocolate butter slice. Enjoy! #netflix #stranger things #eleven #maple syrup #waffle #eggo
- Bucky's Plum Turnovers
Bucky's Plum Turnovers Instead of getting framed for an assassination and then caught up in an international diplomatic dispute about the jurisdiction of superheroes, Bucky Barnes potentially could have made these super easy plum turnovers from the plums he’d been attempting to buy at the start of Civil War. It wouldn’t have made for as great a movie, but the guy deserves a break and some sweets! As do you, so please enjoy this incredibly easy and delicious plum turnover recipe inspired by The Winter Soldier! Servings: 6 Turnovers Prep Time: 1 Hour Total Time: 2.5 Hours Ingredients Pie Dough 2 cups all-purpose flour 10 tablespoons unsalted butter, chilled 2 large egg yolks 2 eggs, beaten (for egg wash) 4 tablespoons ice water Pinch of kosher salt Plum Filling 2 ½ cups plums 1/3 cup sugar 2 tablespoons brown sugar 1 tablespoon cornstarch 1 tablespoon lemon juice Pinch of kosher salt Instructions Pie Dough: Sift together the flour and salt. Pie Dough: Incorporate the chilled butter into the flour using a pastry cutter or pinching the flour and butter together with the tips of your fingers. Make sure no large lumps remain. Pie Dough: Mix together the ice water and the egg yolks using a fork. Slowly incorporate the mixture into the flour. If the dough starts to get too moist, don't use all of the egg and water mixture. You just want the dough to be moist enough where it will stay together when you squeeze a ball of dough between your palms. Don't add any additional water/eggs after that point. Pie Dough: Dump the dough onto a floured surface. Knead the dough until it becomes a cohesive disk. Make sure there aren't any cracks or any pockets of flour. Wrap the disk in plastic wrap and chill for one hour. Pie Dough: After the dough has been chilled, flour a work surface and unwrap the dough onto it. Use a rolling pin to flatten out the dough by pressing firmly on it in multiple places. Then begin to roll out your dough. If there are any cracks, smush them together and roll out until smooth. Roll until the dough is about 1/8 inch thick. Pie Dough: Cut out rectangles from the dough using a pizza or pastry cutter. Ours were about 2 inches wide and 5 inches tall. Put the rectangles on a piece of parchment paper on a cookie sheet and place back into the fridge. Chill for 30 minutes. Pie Dough: Preheat the oven to 350˚F while the dough is chilling. Filling: Stir together the plums, sugar, salt, and lemon juice. Set aside. Assembly: Remove the chilled pie dough rectangles from the fridge. On half of the rectangles, use a star cut-out to cut a star out of the center. Set aside. Space out the remaining rectangles on a few cookie sheets, leaving space in-between. Spoon out about 1-1 and 1/2 tablespoons of the plum filling onto each rectangle. Assembly: Cover the plum-topped rectangles with the rectangles with stars. Use a fork to press the edges of the two together on all sides. Brush the pastries with an egg wash (2 eggs beaten). Bake: Bake the pastries for 15-20 minutes or until golden brown. Enjoy! #marvel #bucky barnes #winter soldier #plums
- Sorting Hat Butterbeer Cupcakes
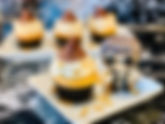
Sorting Hat Butterbeer Cupcakes What’s your Hogwarts House? Find out by taking a bite from these Sorting Hat cupcakes! These Sorting Hat cupcakes are packed with what we imagine the classic Harry Potter beverage, Butterbeer, would taste like! Butterscotch and cream soda are prominent flavors in the cupcake base and buttercream, with butterscotch chips mixed into the cupcake batter! The Sorting Hat of the cupcake is easy to make and assemble using just fudge-covered Oreos and some Hershey’s Kisses. Servings: 16 Cupcakes Prep Time: 1.5 Hours Total Time: 2.5 Hours Ingredients Butterbeer Cupcakes 2 cups all-purpose flour 1 cup light brown sugar 1 teaspoon baking soda 1 teaspoon baking powder 1/2 teaspoon salt 3 large eggs 1/2 cup vegetable oil 1 + 1/2 teaspoon imitation butter extract 1/2 teaspoon vanilla extract 1/2 cup buttermilk 1/2 cup cream soda 1 cup butterscotch chips Sorting Hat 1 family size bag of dark chocolate Hershey's kisses 1 package of fudge covered dark Oreos Red, green, blue, yellow, gold, silver, and black sprinkles Gold star sprinkles Butterbeer Buttercream 1 cup salted butter, softened 1/2 teaspoon vanilla extract 1 teaspoon butter extract 2 tablespoon butterscotch topping 3 tablespoons heavy whipping cream 1 tablespoon cream soda 6 cups powdered sugar Instructions Cupcakes: Preheat the oven to 350°F. Prepare two cupcake tins with 16 liners. Cupcakes: In a medium bowl, whisk together 2 cups all-purpose flour, 1 teaspoon baking soda, 1 teaspoon baking powder, and ½ teaspoon salt. Set aside. Cupcakes: Add 3 large eggs, ½ cup vegetable oil, 1/2 teaspoon vanilla extract, 1 + 1/2 teaspoon butter extract, and ½ cup buttermilk. Beat on medium speed until completely combined. Cupcakes: Add ½ of the dry ingredients to the wet ingredients and beat until well-combined. Add ¼ cup of cream soda and beat until well-combined. Repeat until all ingredients are incorporated. Cupcakes: Toss the butterscotch chips in some flour and then fold the butterscotch chips to the batter. Cupcakes: Fill the cupcake liners ¾ of the way full with batter and bake for 20 minutes (or until a toothpick inserted in the center comes out clean). Allow to completely cool. Sorting Hat: Using a knife, cut through the center of each of the fudge Oreos. Scrape out the excess cream from each cookie so you are left with only the cookie covered in fudge. Sorting Hat: Set aside as many Hershey’s kisses as you have cupcakes. Melt the remaining Hershey’s kisses in the microwave in 20 second increments. Once melted, allow to slightly cool and then fill a piping bag or bottle. Sorting Hat: Pipe a tall dollop of melted chocolate on the fudge surface of each Oreo. Then gingerly press a Hershey’s kiss on top of the chocolate. You want the melted chocolate portion of the hat to retain some volume, so do not press down hard. Set the hats aside to cool. Buttercream: In a large bowl, beat 1 cup of salted butter until smooth and creamy. Add vanilla extract, butter extract, butterscotch topping, heavy whipping cream, and cream soda. Beat until well-combined and smooth. Buttercream: Add 6 cups of powdered sugar in 2 cup increments until the desired consistency is reached. If the buttercream is still too creamy, place in the fridge for 5 minutes prior to piping. Assembly: In four small bowls, pour sprinkles and mix together for each house. You'll need a bowl for each of the following color combinations: gold and red, silver and green, silver and blue, yellow and black. Assembly: Using a small knife, carve out the center of each cupcake. I like to cut off the top of each cupcake core to use to cover the filling. Assembly: With 16 completed cupcakes, fill 4 cupcakes with each of the sprinkle combinations so you end up with an even distribution of houses. Assembly: Pipe a double donut on top of each cupcake with the buttercream. Sprinkle gold star sprinkles along the sides of the buttercream. Top each cupcake with a sorting hat. Enjoy! #cupcakes #cupcake #harrypotter #butterbeer #butterscotch #creamsoda
- Harley Quinn Lemon Cake
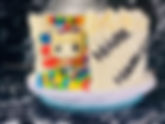
Harley Quinn Lemon Cake Celebrate the emancipation of Harley Quinn with this “fantabulous” cake! The black and white exterior has a colorful surprise inside with flavors that pack a punch! The neon color swirl cake is made from a delicious lemon cake complimented by a lemon cream cheese buttercream. The cake exterior is coated with a layer of sprinkles and topped with tropical Skittles! It’s not quite the egg sandwich that Harley craved in the movie, but do you think she’d like it?! Servings: 12 Servings Prep Time: 4 Hours Total Time: 7 Hours Ingredients Lemon Cake 1 cup + 2 tablespoons unsalted butter, softened 4 eggs, room temperature 1 + ½ cup milk, room temperature 6 tablespoons lemon juice 6 tablespoons vegetable oil 1 + ½ tablespoon lemon extract ½ + ¼ teaspoon salt ½ + ¼ teaspoon baking soda 2 + ¼ teaspoon baking powder 2+ ¼ cup granulated sugar 4 + ½ cups cake flour 2 lemons (zest) Lemon Buttercream (x2) 1 cup unsalted butter, room temperature (2 cups total) 16 oz cream cheese, room temperature (32 oz total) 2 teaspoons lemon juice (4 teaspoons total) 1 teaspoon lemon extract (2 teaspoons total) 6 cups powdered sugar (12 cups total) Decorations 1 + 1/2 cups white sprinkes 8 oz black fondant Letter cut-outs 1 bag Tropical Skittles Instructions Cake: Preheat the oven to 350˚F. Prep with parchment paper and grease 9 inch cake pans. This cake has four layers, so you will need to prep 4 cake pans. If you don’t have that many, then just grease however many you have. You can re-use the same pans after removing the first cakes! Cake: In a medium sized bowl, whisk together the flour, baking powder, baking soda, salt, and the zest of two lemons. Set aside. Cake: In another medium sized bowl, whisk together milk, vegetable oil, and lemon juice. Set aside. Cake: In a large bowl, beat the room temperature butter until smooth and creamy (1-2 minutes). Add in the granulated sugar and beat until fluffy (2-3 minutes). Add the eggs to the mixture one at a time, beating until well-incorporated between additions. Cake: Alternate additions of the milk and flour mixture into the wet ingredients. Mix until well-combined. Cake: Divide the cake into 5 smaller bowls (~1 ¾ cups of batter in each). Dye the cake yellow, neon pink, purple, neon green, and sky blue. Pour ¼ of each batter into each prepared cake pan like you would a color wheel. Using a knife, swirl the colors together. Be sure to clean the knife in between each swirl so the colors don’t bleed over. Cake: Bake the cakes for 25 minutes. Allow to cool in the pan for 15-20 minutes before removing. If you are doing more than one batch in the same pans, be sure the pans completely cool before re-using them to bake the next batch. Cake: Once the cakes are cooled, using a cake leveler or a serrated knife, level each of the cakes. Fondant: This step is best done the day before to allow the fondant letters some time to harden. However, it can be done while the cakes are cooling (that’s what I did!). Roll out 8 ounces of black fondant. Using letter stencils cut out ‘HARLEY QUINN’. Do it as many times as you can. It’s always good to have back-up. Set aside to harden while you prepare the rest of the cake. Buttercream*: I prefer to make the buttercream in two batches, one for the crumb coat and one for the exterior. I freeze the cake in between the crumb coat and the exterior layer, so I like to have a fresh batch for the second step. However, you are welcome to just do it all at once and save the buttercream! Buttercream: In a large bowl, beat 1 cup of unsalted butter (room temperature) with 2 8 oz packages of cream cheese. Beat until smooth and creamy (3-5 minutes). Buttercream: Add 2 teaspoons of lemon juice and 1 teaspoon of lemon extract. Beat until well incorporated. Add 6 cups of powdered sugar in 2 cup increments. Beat well in between additions. Assembly: Spread some frosting on the base of a cake board and place one layer of cake on top of it. Pipe a layer of frosting over the layer and then top with another cake layer. Repeat for all four layers of the cake. Assembly: Spread a generous portion of frosting on the top and on the sides of the cake. Using a bench scraped, go along the sides of the cake until the sides are straight and even. Place the cake in the freezer for 1-2 hours. Buttercream: Prep the second batch of buttercream, or prepare the remaining half if you did one batch. Assembly: Pipe a thick swirl of buttercream along the sides and top of the cake. On the top of the cake, use an angled spatula to smooth out the top. Be sure to hold the spatula straight to get the top layer as even as possible. Then go around the cake with the bench scraper. Hold the bench scraper straight as you spin the cake around to make sure you have clean lines on the edges of your cake. Be sure to scrape the excess buttercream off the bench scraper as you twirl to keep the edges straight as possible. You will have residual buttercream on the top of the cake. Smooth it again utilizing the angled spatula. Then go over the top with the bench scraper to get a clean and straight surface on the top of the cake. Assembly: Place the ‘HARLEY QUINN’ fondant cut-outs along the sides of the cake at an angle, starting at the bottom and working the way to the top of cake. Start each letter pattern about ~ 4 inches from where you started the last. Repeat until the sides of the cake all have the same pattern. Taking a handful of white sprinkles, press the sprinkles against the side of the cake until all sides of the cake are coated with sprinkles. Assembly: Fill a piping bag with a star tip and pipe swirls along the top edge of the cake. Sprinkle the swirls with more white sprinkles. Assembly: In the center of the cake, dump the bag of tropical Skittles and spread out until the top of the cake is covered. Enjoy! #dc #harleyquinn #lemon
- Spiderman Cookies & Cream Cupcakes
Spiderman Cookies & Cream Cupcakes If you’re on the hunt for a cupcake recipe that tastes EXACTLY like an Oreo cookie, you can stop your search here! This cookies and cream cupcake recipe has crushed Oreos in the batter as well as not one, but two!, Oreo cookies hidden inside of each cupcake. These cupcakes are topped with a vanilla buttercream and chocolate sauce to really bring the flavor profile home. ([Homecoming/Far From Home pun intended]) Servings: 12-16 Cupcakes Prep Time: 1.5 Hours Total Time: 4 Hours Ingredients Cookies & Cream Cupcakes 1/2 cup unsalted butter, room temperature 2 egg whites 3/4 cup sour cream 1/4 cup milk 1 teaspoon vanilla extract 1 teaspoon baking powder 1/2 teaspoon baking soda 1/4 teaspoon salt 1 cup all-purpose flour 3/4 cup granulated sugar 1/3 cup cocoa powder 2 tablespoons melted chocolate 1 package of Oreos 1 package of Mini Oreos Vanilla Buttercream & Chocolate Sauce Vanilla Buttercream: 1 cup unsalted butter, room temperature Vanilla Buttercream: 5 + 1/2 cup powdered sugar Vanilla Buttercream: 1 tablespoon vanilla extract Vanilla Buttercream: 4 tablespoons heavy whipping cream Vanilla Buttercream: Red icing color Vanilla Buttercream: Blue icing color Chocolate Sauce: 1 cup dark chocolate chips Chocolate Sauce: 2 tablespoons unsalted butter Chocolate Sauce: 1/4 cup brown sugar Chocolate Sauce: 1/3 cup heavy cream Chocolate Sauce: Black chocolate color dye Instructions Cupcakes: Preheat the oven to 375°F. Prepare cupcake tins with 16 liners. Set aside. Cupcakes: In a medium bowl, mix together 1 cup all-purpose flour, 1/3 cup cocoa powder, 1 teaspoon baking powder, 1 teaspoon baking soda, and 1/4 teaspoon salt. Set aside. Cupcakes: In a large bowl, beat 1/2 cup of unsalted butter until smooth and creamy (2-3 minutes). Add 3/4 cup granulated sugar and beat until smooth and creamy (2-3 minutes). Add 2 egg whites and beat until white and fluffy (1-2 minutes). Add 1/4 cup milk, 3/4 cup sour cream, 1 teaspoon vanilla extract, and 1/4 cup milk. Melt 2 tablespoons of chocolate chips in the microwave in 20 second increments. Add to the batter. Beat until well-combined (2-3 minutes). Cupcakes: Add the dry ingredients to the wet ingredients and mix until just combined. Cupcakes: Put 10-14 Oreo cookies in a food processor (or put in a plastic bag and crumble with a rolling pin) until you have 3/4 cup of crushed Oreos. Don't worry about removing the cream from inside the Oreos before crumbling - we left ours as is! Fold the crushed Oreos into the batter. If you would like, add black food coloring to the batter. Cupcakes: In the bottom of each of the cupcake liners, put 1 Oreo. Put a spoonful of batter over the top of the Oreo. Put another Oreo on top, pressing down until it rests against the first Oreo. Cover the Oreo with just enough batter to cover the surface of the cookie. These cupcakes are easy to overfill because the Oreos take up so much space. As such, you may want to prepare 1/2 double Oreo and 1/2 with only one Oreo just to be on the safe side with your measurements! Cupcakes: Bake for 5 minutes at 375°F. Lower the oven temperature to 350°F and bake for an additional 20-25 minutes. Allow to cool completely. Chocolate Sauce: In a large microwave safe bowl, stir together 1 cup of dark chocolate chips, 2 tablespoons of unsalted butter, 1/4 cup of brown sugar, 1/3 cup of heavy cream. Melt in the microwave in 20 second increments until completely melted. Add black chocolate color dye, if you would like. The chocolate is already pretty dark, but just in case you want it completely black. Don't use black icing color or regular food coloring or it will ruin the chocolate. Wilton makes some great candy color dyes, and I would recommend using those. Allow the chocolate to cool completely prior to moving to a piping bag or bottle. Buttercream: In a large bowl, beat 1 cup of unsalted butter on high speed until smooth and creamy (2-3 minutes). Add 1 tablespoon of vanilla extract and 4 tablespoons of heavy whipping cream. Add 5 + 1/2 cups total of powdered sugar in increments. Buttercream: Take out about 1/4 of the buttercream and set aside in a separate bowl. This buttercream will stay white and will go on the very top of the cupcake. Split the remaining 3/4 of the buttercream in two bowls. Dye one red and one blue. Fill two piping bags with each of the frostings. Buttercream: Place a large sheet of cling wrap down onto the counter. Pipe a line of blue frosting, and then red frosting, over and and over until you have about 8 lines. Roll the cling wrap over the frosting until you get a cylinder. Place in the fridge for ~5 minutes before piping. Assembly: Pipe a double donut of the red & blue frosting on top of each of the cupcakes using a circular tip. On the top of the double donut, draw a circle and cover up the center with the chocolate sauce. Then go along the side of the circle with the chocolate sauce and press until you get a drip of chocolate down each of the sides. Pipe a white dollop of frosting onto the top using a star tip. Assembly: Top each of the cupcakes with a mini Oreo. Remove the creme filling from the remaining mini Oreos and crush in a food processor (or in a plastic bag with a rolling pin). Sprinkle over the top of each donut. Enjoy! #cupcakes #marvel #spiderman #cookies and cream #oreo
- Wonder Woman Lemon Bars
Wonder Woman Lemon Bars These lemon bars are the perfect summer treat! They are incredibly easy and quick to make, but they are impressive when it comes to their flavor! These lemon bars are also dyed to be golden and topped with a red fondant star to mimic Wonder Woman’s crown. While we have to wait a few more months before Wonder Woman 1984 hits theaters, enjoy these sweet treats with a watch of Wonder Woman or Justice League to tide you over! Servings: 12 bars Prep Time: 1 Hour Total Time: 5 Hours Ingredients Crust 1 cup unsalted butter, melted 2 teaspoons vanilla extract 1/2 teaspoon salt 1/2 cup granulated sugar 2 cups + 2 tablespoons all-purpose flour Lemon Filling 6 eggs, room temperature 2 cups sugar 6 tablespoons all-purpose flour 1 cup lemon juice Yellow/gold food coloring Decorations 4 ounces red fondant Powdered sugar Instructions Lemon Bars: Preheat the oven to 350˚F. Grease and line a 13x9 glass pan with parchment paper. Crust: In a large bowl, melt 1 cup of butter in the microwave. Allow 3-5 minutes to slightly cool. Add in 1/2 cup granulated sugar and beat until well-combined. Add vanilla extract and salt and beat until completely mixed. Lastly, add in 2 cups and 2 tablespoons of all-purpose flour and beat until a sandy texture is reached (1-2 minutes). The batter will be clumpy. Crust: Dump the crust into the glass pan. Using your hands, press the dough flat until it covers the base of the pan. You can use a smaller 8x8 baking pan to press and smooth the dough to even out the layers. Bake for 25 minutes. Once baked, poke holes just on the surface of the crust throughout the pan. You do not need to wait until the crust is cooled before prepping the lemon filling. Lemon Filling: In another large bowl, sift together 2 cups of sugar and 6 tablespoons of all-purpose flour. Add 6 eggs, 1 cup of lemon juice, and a few drops of yellow/gold food coloring. Beat until well-combined (1-2 minutes). Lemon Bars: Pour the filling over the crust. Bake for 28-30 minutes. Allow to sit out at room temperature for 2 hours, and then refrigerate for 2 hours. Decorations: While the lemon bars are resting, roll out 6 ounces of red fondant. Using a star cookie cutter or wax paper cut out like a star, cut out 12 red stars. Allow the fondant to sit out while the lemon bars are resting to firm up. Decorations: Once the bars have been chilled, top the lemon bars with sifted powdered sugar. Remove the bars from the baking pan, and cut into slices using a sharp knife for crisp edges. Top each bar with a red fondant star. Enjoy! #bars #dc #wonder woman #lemon
- Dr. Strange Portal Cinnamon Rolls
Dr. Strange Portal Cinnamon Rolls If your family is anything like mine, you gave a standing ovation during Endgame (spoiler alert!) when the portals started opening up and all of our favorite heroes came to save the day. These cinnamon rolls inspired by Doctor Strange’s portals just might be good enough for a standing ovation of their own! These cinnamon rolls are soft and buttery with a delicious cinnamon pecan filling. They are topped with a simple caramel sauce and sprinkles reminiscent of Dr. Strange’s magic portals! Servings: 12 Cinnamon Rolls Prep Time: 1 Hour Total Time: 4 Hours Ingredients Cinnamon Rolls 1/2 cup unsalted butter, melted 2 cups whole milk, warm 2 1/4 teaspoons active dry yeast 1 teaspoon baking powder 2 teaspoons kosher salt 1/2 cup sugar 5 cups all-purpose flour, divided into 4 cups and 1 cup Filling 3/4 cup unsalted butter, softened 3/4 cup light brown sugar 2 tablespoons ground cinnamon 1 cup chopped pecans, toasted Topping 1/4 cup unsalted butter 2 and 1/2 tablespoons heavy whipping cream 1/2 cup dark brown sugar Red & gold sprinkles Instructions Cinnamon Rolls: Warm up 2 cups of whole milk in the microwave to 100-110˚F. If you don’t have a food thermometer, then you can judge the temperature using the tip of your finger. It should feel slightly warm, a little above your body temperature. If it’s too hot, then allow to cool before proceeding. Cinnamon Rolls: Melt ½ cup of unsalted butter in the microwave. You are wanting it to be the same temperature as the milk, so you may want to melt the butter first and allow it to cool slightly before warming the milk. Cinnamon Rolls: In a large bowl, stir together the milk, butter, and ½ cup of granulated sugar until fully incorporated. Cinnamon Rolls: Sprinkle 2 ¼ teaspoons (a single packet) of active dry yeast over the liquid mixture. Stir the yeast into the mixture, and then leave out to bloom in a warm area for 10 minutes. Cinnamon Rolls: Once the yeast has bloomed, add 4 cups of all-purpose flour. Stir until just combined. Cover with plastic wrap or a towel and allow to rise for 1 hour in a warm area. Allow the dough to rise until it has doubled in size. Cinnamon Rolls: Prep 2 9-inch baking pans with butter and parchment paper. Set aside. Pecan Filling: Toast 1 cup of chopped pecans in a skillet over medium heat until browned. Feel free to add some oil or a dash of cinnamon. Pecan Filling: In a large bowl, mix together the pecans, ¾ cup light brown sugar, 2 tablespoons of ground cinnamon, and ¾ cup of unsalted butter (softened). Set aside. Cinnamon Rolls: Once the dough has doubled in size, stir in an additional 1 cup of all-purpose flour, 1 teaspoon of baking powder, and 2 teaspoons of kosher salt. Stir until just combined, but don’t worry if there is a lot of flour within the dough still. It will work itself into the dough in the next step. Cinnamon Rolls: Lightly flour a kitchen counter or nearby surface and dump out the bowl onto the surface. Knead the dough for at least 10 minutes until the dough springs back when poked. Cinnamon Rolls: Roll out the dough using a rolling pin into a large rectangle. When rolling, try to correct as you go to ensure the shape is a rectangle when finished. When done, you can sharpen the edges using a scraper, spatula, or knife. However, you do want them to be as sharp as possible. Cinnamon Rolls: Spread the pecan filling onto the dough, making sure it’s an even spread across the entire surface area of the dough. Then roll the dough into a log, attempting to maintain the same diameter as you move. This is easiest accomplished by using your forearm and rolling the dough all at once instead of in parts. Pinch together the seam and then rest the log with the seam side down. Cinnamon Rolls: Cut the log into equal pieces about 1 ½ inches thick using a knife or dental floss. Dental floss is a great trick because it doesn’t flatten the dough when slicing. Just put the dental floss under the log, and pull the two ends together until it slices cleanly through. Cinnamon Rolls: Place cinnamon rolls along the edges of each of the prepared pan with one cinnamon roll in the center. Repeat for the second pan. Cover both pans with a towel and allow to rise for an additional 1 hour. Cinnamon Rolls: Preheat the oven to 350˚F. Bake the cinnamon rolls for 25-30 minutes, or until golden brown. Allow to cool while making the caramel sauce. Topping: Melt ¼ cup of unsalted butter on the stove. Once completely melted, add ½ cup of dark brown sugar and 2 1/2 tablespoons of heavy cream. Continue stirring over medium heat until completely melted. Allow the caramel to bubble for 3-4 minutes and then remove from heat. The caramel sauce hardens quickly, so you will need to immediately transfer onto the cinnamon rolls. Topping: The best method is to drizzle over the top of the cinnamon rolls with a spoon or knife. The caramel sauce is VERY hot and will burn your hands if attempting to use a piping bag or handle closely. The best method would be to place on a spoon and then drizzle over the top of the cinnamon roll in a circular fashion along the lines of the cinnamon roll to create the portal effect. You can also spread evenly across the cinnamon rolls and then use sprinkles to create the circular effect. Topping: Sprinkle red and yellow sprinkles along the top of the caramel sauce on the cinnamon rolls. Enjoy! #breakfast #cinnamon roll #dr strange #marvel #pecan #cinnamon #caramel
- Strawberry Jaws Cupcakes
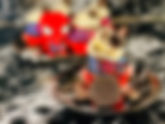
Strawberry Jaws Cupcakes These Jaws cupcakes perhaps edge into the PG-13 category with the drizzles of red chocolate sauce and strawberry filling, but hopefully they’re not too scary! They definitely are delicious, though! These strawberry cupcakes are made with chopped fresh strawberries with a light and airy cupcake base. Inside of each is a sweet strawberry filling. They are topped with a tri-color cream cheese frosting, red chocolate sauce, and a giant shark fin! Servings: 12 Cupcakes Prep Time: 1.5 Hours Total Time: 3 Hours Ingredients Cupcakes 1/2 cup unsalted butter, room temperature 1 egg, 2 egg whites 1/4 cup milk 1 1/2 cup all-purpose flour 1 cup sugar 1 teaspoon baking powder 1/4 teaspoon salt 2 teaspoons vanilla extract 1 cup strawberries Cupcake Filling 2 cups strawberries 1/2 cup sugar 1 teaspoon lemon juice 2 tablespoons cornstarch 2 teaspoons warm water Frosting & Decorations Frosting: 1/2 cup unsalted butter, room temperature Frosting: 8 oz cream cheese, room temperature Frosting: 1 teaspoon vanilla extract Frosting: 1/4 teaspoon salt Frosting: 5 cups powdered sugar Frosting: Red & Blue food coloring Decorations: 12 oz white fondant Decorations: Black food coloring Chocolate Sauce: 1 cup red candy melts Chocolate Sauce: 2 tablespoons unsalted butter Chocolate Sauce: 1/4 cup brown sugar Chocolate sauce: 1/2 cup heavy whipping cream Instructions Cupcakes: Preheat the oven to 350°F. Line a 12-inch cupcake pan and set aside. Cupcakes: In a medium bowl, whisk together 1 & ½ cups of all-purpose flour, 1 teaspoon of baking powder, and ¼ teaspoon of salt. Set aside. Cupcakes: In a large bowl, beat butter until fluffy (about 2-3 minutes). Add 1 cup of granulated sugar and beat until creamy and smooth (another 2-3 minutes). Add in the egg, egg whites, and vanilla extract. Beat until well-combined. Cupcakes: Add the flour mixture to the wet ingredients and beat until well-combined. Add in the milk and beat until just combined. Then carefully fold in the chopped strawberries. Cupcakes: Fill the cupcake liners ¾ of the way full with the cupcake batter. Tap on the kitchen counter to remove any air bubbles. Bake for 20 minutes or until a toothpick inserted in the center of the cupcake comes out with only a few crumbs. Allow the cupcakes to cool completely before decorating. Cupcake Filling: In a medium saucepan, simmer 2 cups of diced strawberries over medium heat for 4-5 minutes. Add ½ cup sugar, 1 teaspoon of lemon juice, 2 tablespoons of cornstarch, and 2 teaspoons of water. Simmer for 2 more minutes and then set aside to cool. Decorations: Fondant decorations are best made the day before to allow the fondant time to dry out. However, these can be made while the cupcakes are cooling if you’re pressed for time! Knead a tiny bit of black food coloring in with the white fondant in order to create a gray color for the shark fin. Decorations: Divide the fondant into 12 triangle pieces. In each piece, press a toothpick into the center. Shape and flatten out the triangle so that it is flat with a slight curve near the top on one of the side, just like a shark fin. Using a knife, carve out small cuts in the straight edge of the fin to mimic a shark. Set the decorations aside to harden. Chocolate Sauce: In a medium microwave safe bowl, add 1 cup of red candy melts, 2 tablespoons of unsalted butter, ¼ cup of brown sugar, and ½ cup of heavy whipping cream. Microwave using the defrost setting in increments of 20 seconds until completely melted. Allow the sauce time to cool before using it to frost the cupcakes. Once cooled, add to a piping bag or a chocolate drizzle bottle. Frosting: In a large bowl, beat together ½ cup of unsalted butter and 8 ounces of cream cheese until creamy. Beat in the vanilla extract and salt. Add in the powdered sugar in portions until you achieve the desired consistency. Frosting: Divide the frosting into three bowls (with one bowl a little less than the others). Dye one bowl a dark blue and the other bowl a light blue. Leave the smallest third bowl white. Fill a piping bag with each of the three colors. Frosting: Place down a piece of saran wrap onto the counter. Pipe a line of each of the colors onto the center of the saran wrap until you have 3 lines of each color. Roll the saran wrap and then spiral it so that the colors are combined. Place the saran wrap roll inside of a large piping bag. Assembly: Core each of the cupcakes and fill with the cooled cupcake filling. I like to chop off the top part of the cupcake core to seal over the top, but you can also just pipe over the top with frosting! Assembly: Pipe the frosting on top of each of the cupcakes and drizzle the red chocolate sauce on top. Top each cupcake with one of the fondant shark fins. Enjoy! #cupcakes #classics #jaws #strawberry
- Captain America Red, White, & Blue Cake
Captain America Red, White, & Blue Cake This shield cake is the perfect way to pay homage to an Avenger near and dear to my heart, Captain America! The base of the cake is a white wedding cake, so we can say it pays tribute to his happily ever after with Peggy Carter! This white cake has three layers dyed red, white, and blue, filled with delicious buttercream frosting sprinkled with stars. It’s a perfect treat to celebrate the end of a Captain America movie marathon! Which one is your favorite? Servings: 12 Prep Time: 4 Hours Total Time: 7 Hours Ingredients White Cake (x3) 1 cup unsalted butter, room temperature (3 cups total) 6 large egg whites, room temperature (18 total) 1 + 1/4 cup milk, room temperature (3 + 3/4 cups total) 2 + 1/2 teaspoon baking powder (7 + 1/2 teaspoons total) 1/2 teaspoon salt (1 + 1/2 teaspoons total) 1 teaspoon clear vanilla extract (3 teaspoons total) 1/4 cup vegetable oil (3/4 cup total) 1 + 3/4 cups granulated sugar (5 + 1/4 cups total) 1 + 3/4 cups all-purpose flour (5 + 1/4 cups total) Buttercream frosting (x2) + Decorations 1 cup pasteurized egg whites, room temperature (2 cups total) 4 cups unsalted butter, room temperature 6 cups powdered sugar 1/2 teaspoon salt 1 tablespoon clear vanilla extract Red, white, & blue sprinkles 48 ounces red fondant 12 ounces white fondant 6 ounces blue fondant Star cookie cutter Instructions Cake: Preheat the oven to 350°F. Grease and line a 10-inch round baking pan with parchment paper. We will be making 3 total 10 inch cakes, so you can prep additional pans if you have them available. When we made this recipe, we did one cake at a time. However, feel free to combine all of the ingredients at once and then divide the cake into three portions. Whatever is easiest for you! Cake: In a large bowl, beat 1 cup of unsalted butter until fluffy (about 1-2 minutes). Add 1 & ¾ cups of granulated sugar. Beat until creamy and smooth (about 2-4 minutes). Set aside. Cake: In a medium bowl, whisk together 1 & ¾ cups of all-purpose flour, 2 & ½ teaspoon baking powder, and ½ teaspoon of salt. Set aside. Cake: In another bowl, whisk together 1 & ¼ cup of milk, ¼ cup vegetable oil, and 1 teaspoon of clear vanilla extract. Set aside. You can use ½ teaspoon of almond extract if you don’t have clear vanilla extract. You can also use regular vanilla extract; the cake just won’t be as white. Cake: Add the egg whites to the sugar and butter mixture. Beat until well-combined (about 1-2 minutes). Cake: Alternate the addition of the flour and milk mixture into the sugar, butter, and eggs. Alternating half of each at a time works perfectly. If you are making the white cake layer, put the batter in the prepped 10 inch pan. If you are making the red or blue layer, add the red or blue food coloring and mix until the desired color is achieved. Then place in the 10 inch pan. Cake: Bake the cake for 25-35 minutes or until a toothpick inserted in the center of the cake comes out with only a few crumbs. Allow the cakes to completely cool. As mentioned above, if you opted to make the cake layers one at a time, repeat the above steps for each layer of the cake. Cake: Once the cakes are cool, level the cakes using a cake leveler or a large serrated knife. For the cleanest look, also trim along the sides of the cake. Frosting: You will need two batches of frosting to cover the cake. We made ours one batch at a time, but you can make them all at once. Whatever is easiest for you. The measurements for doubling the recipe are above, otherwise follow the instructions below twice. Frosting: In a large bowl, beat ¾ cup of unsalted butter together until creamy (about 2-3 minutes). Add 5 & ½ cups of powdered sugar and beat until smooth. Frosting: Add 1 tablespoon of clear vanilla extract (or almond or regular extract, whatever you have on hand; though if you use almond extract, only use ¼ tablespoon), ¼ teaspoon of salt, and 6 tablespoons of heavy cream. Beat until smooth. Frosting: In one batch (or in half of the batch if you’ve opted to make one batch), add in the desired amount of sprinkles. We will use this layer for the inside of the cake, and the clean white layer for the crumb coat. Assembly: On a round cake base, place a dollop of frosting to root your cake. Place the blue layer down first. Cover the top of the blue cake with the sprinkled frosting. Then add the white cake, and cover with the sprinkle frosting. Lastly, add the red cake. Assembly: Frost the outside of the three cake layers with a thin crumb coat of the icing. Go back over the crumb coat with a more generous layer of frosting, and smooth over with an icing smoother so that you have clean lines. Set aside. Decorations: Knead the red fondant together and roll out to 1/8 of an inch. It’s a lot of fondant, so be careful when handling. Once rolled out, roll half of it over the top of the rolling pin and transfer over the top of the cake. Using a fondant smoother, smooth across the top of the cake and pull the fondant down to cover the edges. Cut off any excess. Smooth the sides with a fondant smoother. Save the excess, as we will be using it for the remaining shield. Decorations: Knead and roll out the white fondant to 1/8 of an inch thickness. Use a 8 inch round cake pan to cut out a circle and place on top of the red fondant on the cake. In the remaining white fondant, cut out several sizes of stars. Set aside. Decorations: Roll out the excess red fondant again. Using a 6 inch round cake pan, cut out a circle. Place on top of the white fondant on the cake. Decorations: Roll out the blue fondant to 1/8 of an inch. Find a cup that matches the size of the largest cookie cutter white star you made. Cut out a circle using the cup, and place on top of the red fondant on the cake. Decorations: Place the largest white star on the top of the blue fondant on the cake. Wet one side of the remaining white stars and scatter along the sides of the cake. We also used large white gum balls for the bottom of the cake, but that’s up to you! Enjoy! #cake #marvel #captain america #vanilla #wedding cake #white cake